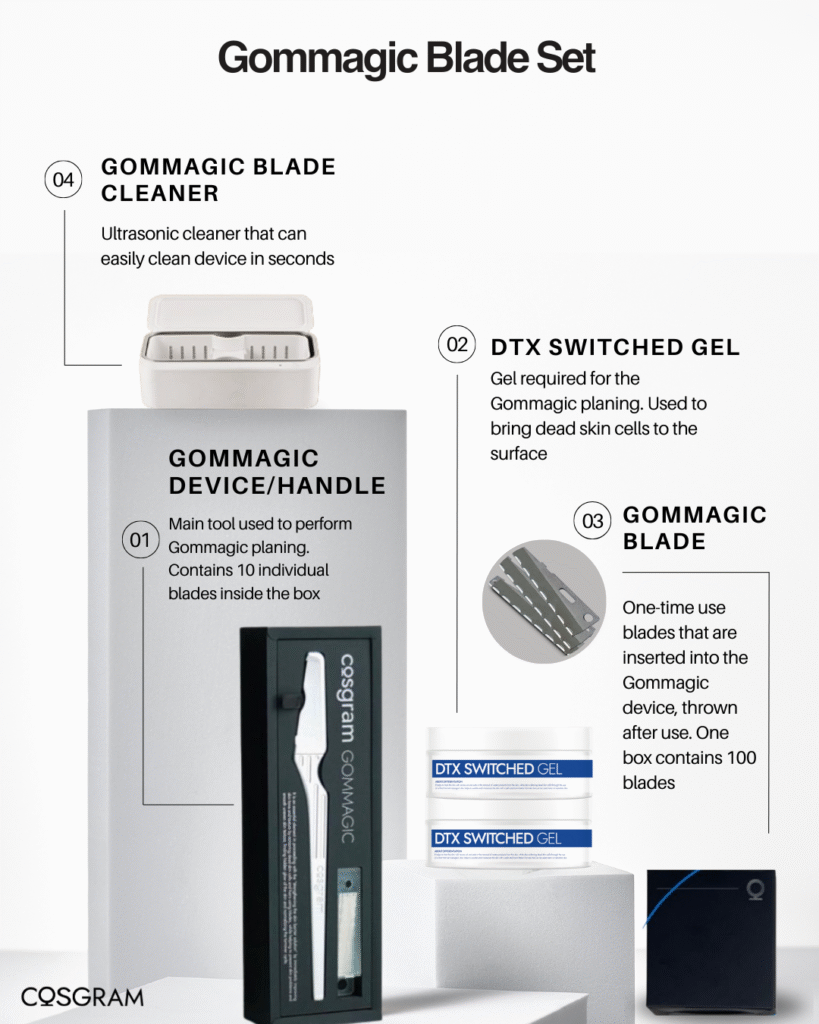
Gommagic Blade Set
Product Overview
If there is a specific section you would like to review, click on the icon/text below to automatically scroll to that portion.
About Gommagic planing
All about the product, its differences versus traditional dermaplaning, and more!
What to know before use
Review the directions to follow, understanding & practicing the stroke techniques
Setting up the device
Inserting the blade, getting the right angle, and cleaning the device
Practice methods and demo
Step-by-step instructions on the proper angle for safety and showcasing the device at work
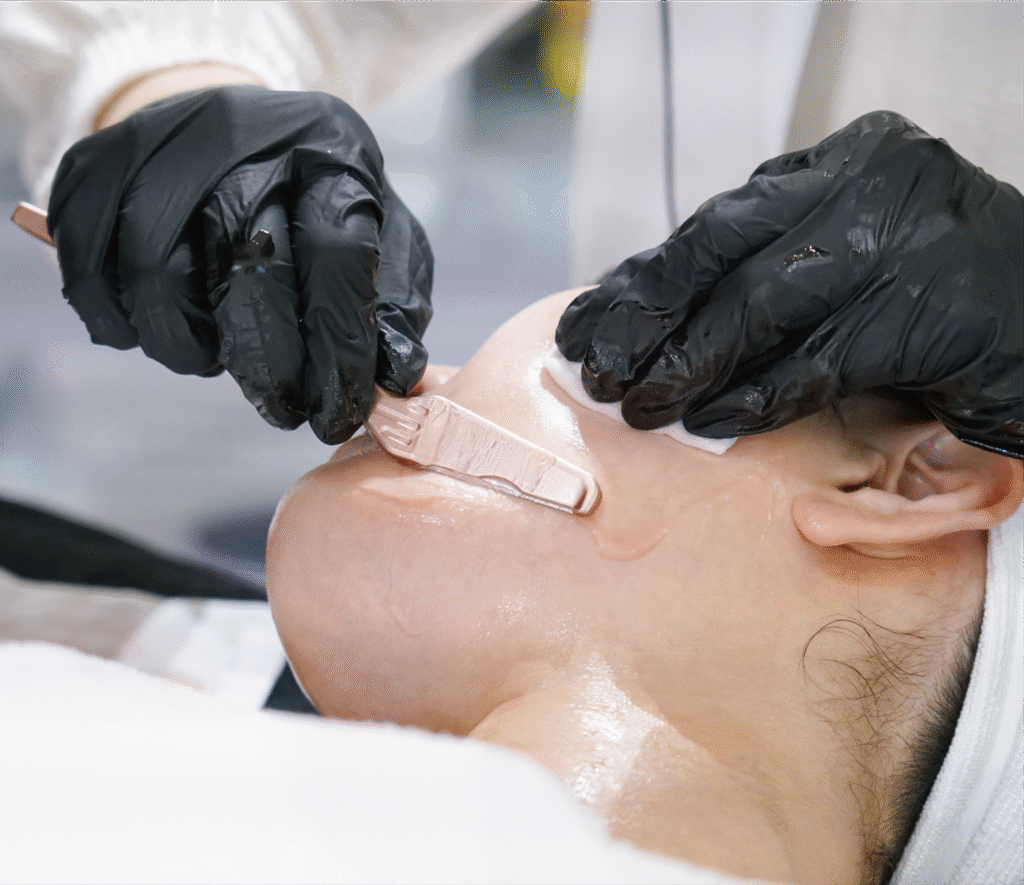
A newer, safer way of dermaplaning
Gommagic Blade
COSGRAM’s Gommagic device is a high quality, science-based upgrade to traditional dermaplaning that’s innovative, smarter, and cost-effective for professionals.
PROVEN WITH RESULTS
Visible results that you can see right after the treatment--smoothing the uneven texture of the skin and allowing the pores to breathe again by getting rid of its dead skin cells.
CONVENIENCE
The ergonomic design allows you to have optimal grip with an angled head that makes it easier to handle the blade. Simply switch the cartridge out once the treatment is complete. The device can be easily washed with water. A smart way to save money while keeping hygiene top-notch.
LIGHTWEIGHT & SAFE
The tool is designed to address common challenges of traditional dermaplaning. Its lightweight structure reduces wrist strain, and the 30° angled blade head allows for controlled exfoliation with minimized risk to the skin. This makes it safe and easy to use for professionals at all experience levels.
Meet the partner that does the magic
DTX Switched Gel
The Gommagic device is used alongside with the DTX Switched Gel, the product that makes this whole process possible. They work in synergy, with the gel softening the dead skin cells and bringing them to the surface to be removed through Gommagic planing.
NATURAL HEAT WITHOUT CHEMICALS
Contains glycerin, a naturally occurring component that generates mild warmth through friction. When gently massaged for 2–3 minutes, the skin’s surface temperature increases by approximately 2°F. This gentle mechanism makes the treatment suitable for all skin types.
BRINGING WASTE TO THE SURFACE
The warmth helps expands the pores and soften dead skin cells. As pores open, the gel helps bring all the waste, impurities, and excess oil to the surface of the skin--prepping it for exfoliation.
VERSATILE AND POWERFUL
Besides working with the Gommagic device, the gel can be used for other purposes. It can be used as a massage cream replacement on various body parts, including the face, arms, legs, heels, and areas with calluses. When done, remove gel with a wet sponge or towel.
Introduction to the Gommagic Blade Set
Traditional Dermaplaning vs. Gommagic Planing
Dermaplaning
The general procedure of using a blade for exfoliation
Method:
Uses a sterile, surgical blade to gently skim the surface of the skin, removing dead skin cells and fine hair.
Purpose:
To exfoliate the skin, improve skin texture, and enhance the absorption of skincare products.
Benefits:
Produces smoother, brighter, and glowing skin.
Considerations:
Requires a skilled esthetician due to the use of a sharp blade. It is a physical exfoliation that may require aftercare to avoid irritation or sensitivity.
Gommagic Planing
Innovation by COSGRAM that builds upon dermaplaning
Method:
Uses the Gommagic Blade and a special gel (DTX Switched Gel) to soften, lift, and remove dead skin cells without cutting or over-peeling.
Purpose:
Created as the solution that addresses all the problems of dermaplaning while maintaining an easier and safer approach
Benefits:
A non-invasive alternative to traditional dermaplaning with all its benefits
Considerations:
Those unfamiliar with Gommagic planing may be reluctant to start learning or have different expectations when receiving treatment due to the traditional views around dermaplaning
What Makes Gommagic Stand Out
1. Convenience
- Ergonomic Design: Provides an optimal grip during procedures.
- Powerful Magnets: Equipped with four strong neodymium magnets for easy attachment and detachment of the blade cartridge.
2. Stability
- Material: Made from aluminum alloy, which is lightweight and resistant to abrasion.
- Corrosion Prevention: The material prevents corrosion from chemical products, allowing for safe sterilization using ultrasonic cleaners or alcohol disinfection.
3. Safety
- Blade Angle: The blade head is designed at a 30° angle to minimize skin damage, making it easy and safe to use.
Easy to Learn. Easy to Use.
1. Convenience
- Ergonomic Design: Provides an optimal grip during procedures.
- Powerful Magnets: Equipped with four strong neodymium magnets for easy attachment and detachment of the blade cartridge.
2. Stability
- Material: Made from aluminum alloy, which is lightweight and resistant to abrasion.
- Corrosion Prevention: The material prevents corrosion from chemical products, allowing for safe sterilization using ultrasonic cleaners or alcohol disinfection.
3. Safety
- Blade Angle: The blade head is designed at a 30° angle to minimize skin damage, making it easy and safe to use.
What to know before use
Muscle and Stroke Direction
Before getting started in using the device, there are some key information to be aware of to ensure your success during treatment. Part of this is familiarizing yourself with the muscle direction on the face, such as the one shown in the picture above.
Doing so will allow you to know the correct direction to make the tension and for the stroke.
Blue = Device/Stroke Direction
Orange = Tension Direction
Using the diagram below, start with the neck area. Create tension with your fingers, following the orange arrows and moving your device with the blue arrows. When approaching curved areas such as the forehead, use shorter strokes to avoid increasing pressure on the skin.
1.
Neck Area
2.
Outer Cheek
3.
Inner cheek, lips and chin
4.
Forehead
Practice Using the Device
To build your confidence with the Gommagic handle, we highly recommend practicing on your arms first. Follow the diagram and the video provided as reference.
1. MAKE THE TENSION
Using your other hand, create tension on the skin in the opposite direction (refer to picture above as needed)
2. FOLLOW THE STROKE DIRECTION
Move the device forward about an inch and a half and then a quarter inch back, repeating this process
Setting up the Device
Inserting the Blade
Practice inserting the blade into the Gommagic device so you can get used to the process during treatment. The magnets inside should help the blade go in easily and none of the edges should be showing. If you are starting out and want to push the blade in a little more, make sure to get a towel to prevent any risk of injury. You may also find it helpful to set the video’s playback speed to be slower in order to better observe the process.
Getting the Proper Blade Angle
Placeholder text explaining how to get the proper angle while doing Gommagic planing
How to Clean the Gommagic Blade handle
ULTRASONIC CLEANSER FROM COSGRAM
Fill the cleaner with water and plug in the cord. Place the Gommagic device inside and leave it in for about 15 seconds. You should see remnants of the DTX Switched Gel seeping out and your device will be ready for use again once dried. Avoid leaving the Gommagic device into the water for more than 2-3 minutes as it risks damaging the magnets inside.
NO CLEANSING DEVICE
Hold the device under running water for 20-30 seconds. Gently shake the handle back and forth to rinse out any gel while it is under water or dip the head of the device into a bowl of water and move it in a sweeping motion. Do this for 20-30 seconds. Wipe the handle with a paper towel to dry it
Practice methods & Demo
Showcasing: Gommagic Blade
Treatment Protocol
To see the full, detailed protocol and video of our signature Lux-Glow treatment, click here
1. Cleansing
Remove all waste and fine makeup residues with All-in-One Remover and Intoscene Cleansing
2. Smoothen
Use Pico Water to calm and soothe the skin, prepping it for the next product to be used
3. Apply Gel
Take one scoop of DTX Switched Gel with a spatula and massage it around on the face. Apply more if just starting out
4. Gommagic Planing
Insert the blade and perform Gommagic planing, making the tension and gently going forward and back with the device
5. Spray
Spray Pico Water again across the face to give extra moisture to the skin and help absorb all the nutrients of the products applied
Tips & Precaution
Before Treatment
- For first-time users, make sure to practice on your arms or legs first to familiarize self with the device
- Provide sufficient consultation to help the client understand the purpose of the treatment
- Avoid exfoliation a week before Gommagic planing
During Treatment
- Apply enough DTX Switched Gel during the 4-5 minute massage
- Always remember that Gommagic planing does not require a lot of pressure, the grip strength should ALWAYS be light throughout the entire procedure
- Avoid bending the elbow to prevent increasing pressure on the blade and adjust your own position around the client as needed
After Treatment
- Apply moisturizing and regenerating products
- Have client avoid products with peeling and scrub for about a week
- Advise them to apply sunscreen frequently during outside activities
Gommagic FAQ
Gommagic planing can be done once every 4 weeks.
Always take into consideration the skin condition at the time of treatment. A light massage of the DTX Switched Gel will do enough exfoliation and give the skin hydration it needs. Make sure to completely remove the product gently.
No. In order to get the desired results from Gommagic planing, the DTX Switched Gel must be used. DTX Switched Gel is part of the process with role written above.
No, unlike traditional dermaplaning, Gommagic planing requires a lot less pressure and requires further education & training.
Apply generous amount that is enough to do massage and Gommagic treatment without irritation. It is recommended to use more to avoid any potential risk of damaging the skin.
No, each blade cartridge is one-time use (not the handle) and cannot be used again even if it is on the same person.
Use shorter strokes about 1/2 inch going forward and 1/10 inch going back.